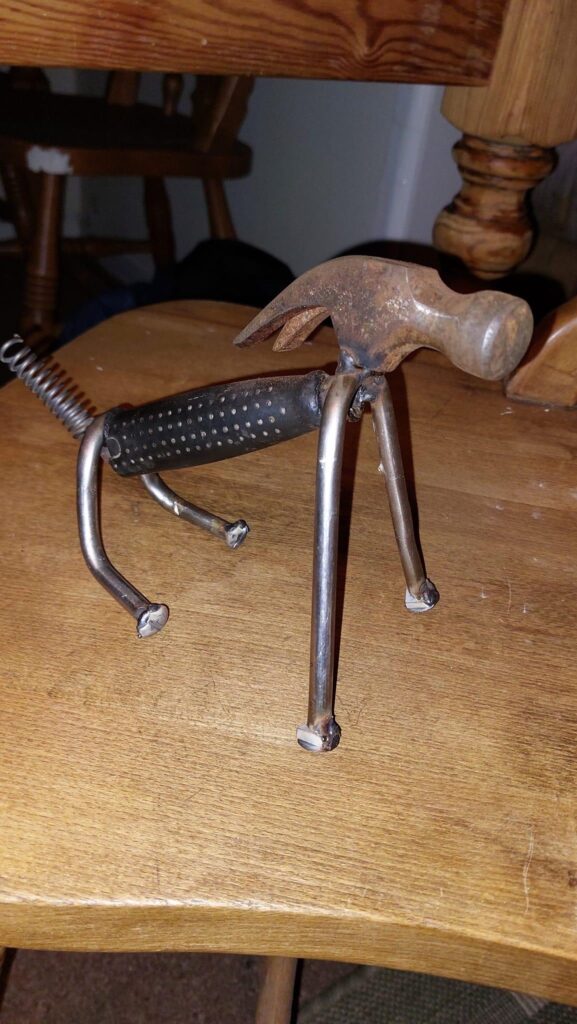
Creating a one-of-a-kind metal dog sculpture is a fantastic project for those who love both art and welding. This DIY guide will walk you through the process of fabricating a charming canine figure using various metal pieces, with an old metal hammer as the body, a spring for the tail, and bent nails for the legs. This project not only recycles old tools and materials but also allows you to flex your creative and welding skills.
MATERIALS NEEDED
- Old Metal Hammer: This will serve as the main body of the dog.
- Metal Springs: Ideal for creating a whimsical, wagging tail.
- Nails: These will be bent and shaped to form the dog’s legs.
- Additional Metal Pieces: For the head, ears, and other details.
- Welding Equipment: Including a welder, welding helmet, gloves, and safety gear.
- Grinder: For smoothing and shaping the metal pieces.
- Metal Files: For fine-tuning and detailing.
STEP-BY-STEP FABRICATION PROCESS
STEP 1: DESIGN AND PLANNING
- Sketch your design to have a clear idea of the final sculpture.
- Plan the size and posture of your metal dog.
STEP 2: PREPARING THE HAMMER
- Clean the old metal hammer thoroughly.
- Decide which part will be the front and back.
STEP 3: FORMING THE LEGS
- Take the nails and heat them if necessary to bend into the shape of dog legs.
- Ensure they are proportionate to the hammer body.
STEP 4: ATTACHING THE LEGS
- Carefully weld the legs to the hammer body. Make sure they are strong enough to support the sculpture.
- Use the grinder to smooth any rough edges.
STEP 5: CREATING AND ATTACHING THE TAIL
- Use a metal spring for the tail. It can be straightened or left coiled, depending on your design.
- Weld the tail to the rear end of the hammer.
STEP 6: ADDING THE HEAD AND EARS
- Choose a suitable metal piece for the head. It can be another smaller tool or fabricated from scrap metal.
- Create or find small metal pieces for the ears.
- Weld the head and ears to the front part of the hammer.
STEP 7: FINAL TOUCHES
- Use metal files to smooth out any sharp edges and refine the details.
- You can add more features like eyes, a nose, or a mouth using smaller metal bits or by etching.
STEP 8: FINISHING
- Consider painting your metal dog or applying a clear coat to prevent rust.
- Add any additional decorative elements if desired.
SAFETY TIPS
- Always wear appropriate safety gear while welding and grinding.
- Work in a well-ventilated area to avoid inhaling fumes.
- Keep a fire extinguisher nearby as a precaution.
This DIY all-metal dog sculpture is not just a fun project but also a great way to repurpose old tools and scraps into art. Each creation will be unique, reflecting the individuality of the materials and the creativity of the maker. Whether you’re an experienced welder or a beginner looking to try something new, this project offers a rewarding way to practice your skills and create something truly special.
Q: What if I don’t have an old metal hammer? Can I use a different tool? A: Absolutely! While a metal hammer provides a unique shape and size for the body, you can use any sturdy metal tool or scrap piece that resembles the body of a dog. Be creative and use what’s available to you.
Q: Is this project suitable for beginners in welding? A: This project is doable for beginners, but it does require basic knowledge of welding and handling tools safely. If you’re new to welding, you might want to practice on some scrap pieces first.
Q: How can I ensure that the sculpture is stable and won’t tip over? A: Stability is key. Make sure the legs are evenly spaced and welded securely. You can also create a wider base by extending the feet or adding additional support at the bottom.
Q: Can I add movement to the sculpture, like a wagging tail? A: Yes, you can add movement by using a flexible spring for the tail. However, ensure it’s securely attached and doesn’t compromise the stability of the sculpture.
Q: What kind of paint should I use if I decide to paint my metal dog? A: Use a paint that’s suitable for metal surfaces. Rust-resistant outdoor paint works well if you plan to keep the sculpture outside. Always apply a primer first for better adhesion.
Q: How long does it typically take to complete this project? A: The time can vary depending on your skill level and the complexity of your design. It could take anywhere from a few hours to a couple of days. Take your time to ensure safety and quality.
Q: What are some creative ideas for customizing my metal dog sculpture? A: You can customize your sculpture in many ways. Consider adding a collar made from a chain, creating a textured fur effect with a welding technique, or even making a companion piece to create a set.
Q: How do I maintain the sculpture, especially if it’s displayed outdoors? A: If the sculpture is outdoors, it’s susceptible to rust. Apply a clear coat to protect it from the elements. Regularly check for any rust spots and touch them up with paint or a rust inhibitor.
Q: Are there any environmental concerns with this project? A: When using old tools and scrap metal, you’re actually recycling materials, which is beneficial for the environment. However, be mindful of the fumes and waste produced during welding and take appropriate measures to minimize their impact.
Q: Can this project be scaled up or down? A: Yes, you can adjust the size of your sculpture based on the materials you have. Just ensure that the proportions of the body parts remain consistent for aesthetic and stability purposes.
Creating a DIY metal dog sculpture is not only a fun and creative project but also a great way to upcycle materials. With a bit of imagination and welding skills, you can bring a unique metal canine companion to life.
EXPLORING SIMILAR DIY METAL ART PROJECTS
If you enjoyed creating the metal dog sculpture, there are numerous other metal art projects you can try that also involve fabrication and welding. These projects allow you to further hone your skills while creating unique pieces of art. Here are some ideas:
1. Metal Cat Sculpture
- Similar to the dog sculpture, use metal tools and scraps to create a cat figure. Items like pliers or wrenches can make interesting shapes for the body or head.
2. Garden Critters
- Create small insects or animals like butterflies, dragonflies, or birds using cutlery, screws, and other small metal pieces. These can be great additions to your garden or as indoor decorations.
3. Abstract Metal Art
- Let your creativity flow and weld together various metal pieces to create an abstract sculpture. This is a great way to use up random metal scraps and can result in a truly unique artwork.
4. Metal Flowers
- Craft flowers from metal using spoons for petals and forks for leaves. These can be painted in bright colors and displayed indoors or in your garden.
5. Themed Wind Chimes
- Use smaller metal pieces to create a themed wind chime. You can base it on a particular shape, like stars or hearts, or go for a more eclectic mix.
6. Metal Tree Sculpture
- Create a tree sculpture using wires or thin metal rods for branches. You can add leaves made from small metal pieces or keep it bare for a minimalist look.
7. Upcycled Metal Furniture
- If you’re up for a bigger project, try creating furniture pieces like a coffee table or a chair using larger metal scraps and tools.
8. Wall Art
- Design and create a piece of wall art. This could be a geometric design, a landscape, or a more abstract composition.
9. Functional Art
- Create pieces that are not only artistic but also functional, like a metal lamp, a candle holder, or a coat rack.
10. Sculptural Fire Pit
- For an ambitious project, design and build a sculptural fire pit for your backyard. This can be both a functional piece and a conversation starter.
Each of these projects allows you to recycle and repurpose metal items, turning them into something beautiful and unique. Remember to always prioritize safety when working with metal and welding equipment, and don’t be afraid to let your creativity guide you. Whether you’re making art for your home, garden, or as a gift, the possibilities are endless.
As an Amazon Associate we earn from qualifying purchases through some links in our articles.